Monthly Archives: December 2010

Creating Sliceforms with Google SketchUp

The following posts describe how to use a Google SketchUp plugin to create Sliceforms.

As an example, I will use the Sliceform Torus that you can see as a YouTube Video:

The plugin was created by Harm Vereek.

The steps of the construction are also available as a YouTube video here.

IMPORTANT
This is quite a complex Sliceform and you should be familiar with the methods for assembling Sliceforms and cutting the slots (not slits). You should follow the earlier posts. You should also make at least some of the template models given also.

There are many ways to create Sliceforms, for example cutting out with scissors, using a laser cutter or a machine like a CraftRobo. I will only describe the simplest way, for printing on card, and make lines to cut either side of as in the templates on this post. If you want to do more, you need to change the parameters for your requirement. I will mention how to do this in the description of its use.

Items needed:
1.    Google SketchUp loaded on your computer and a basic working knowledge of how to use it. You can get it here.
2.    The Sliceforms Plugin available here and here. In Windows you need to install it to the Plugins directory in the Google SketchUp folder in Program Files
3.    You will also need to export the slices to a program which allows you to scale and adjust the position of the slices to fit. I suggest using the SVG exporter  from FlightofIdeas, available as a plugin here. This is version 0.92. We have found that there are problems with version 0.99. If you do not have a program that handles the SVG vector graphics, then I use Inkscape, available here.

Sketchup Sliceform – About the Torus

A torus is a shape like a ring doughnut (or donut in US English). It can be constructed geometrically by taking a circle and rotating about an axis.

You can find out more about a torus on Wikipedia or on Wolfram MathWorld

There are a number of ways to slice a torus to end up with circles. The first is to cut a perpendicular to the axis of rotation. The second is to cut with a plane through the axis; this yields the circles that are being rotated to generate the torus. I am going to slice the torus to show Villarceau circles details of which are on Wikipedia.

I will slice in the direction of a tangent plane.

(Image By Kieff  via Wikimedia Commons)

This video shows the slicing at the tangent I am going to use.

Villarceau’s original paper was published in 1848:

Théorème sur le tore de M. Villarceau (Yvon). Nouvelles annales de mathématiques, journal des candidats aux écoles polytechnique et normale, Sér. 1, 7 (1848), p. 345-347

You can get this original paper by going here and searching for Villarceau.

Sketchup Sliceform – Using the Sliceform Plugin

The following steps will create a model of the Sliceform Torus as shown on YouTube.
It assumes you have Google SketchUp version 6 or above and have the plugin installed. This will appear on the Plugins menu.

Step 1 – Get the torus

I have created a SketchUp file of the torus suitably tilted at 45 degrees. You can get this from the Google 3D Warehouse. Search for Tilted Torus, or click here.

Step 2 – Select the object to slice

In the downloaded model, the parts of the torus have been grouped. If you are creating your own model, make sure that you have grouped all objects/parts you wish to slice. To do this, select them, then use Make Group on the Edit menu.

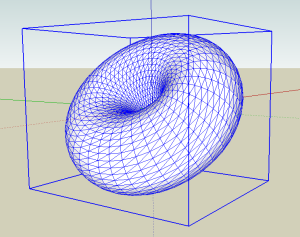
The selected object will then have a box around it:

The following steps take you through the stages of using the plugin to create the Sliceform.

Sketchup Sliceform – Step 3 – Start the Plugin

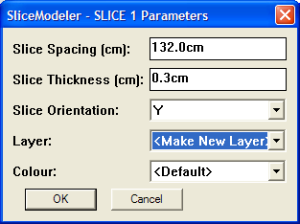
From the Plugins menu, select Slicemodeler 1.4 and you see the default menu:

Choose the direction to slice, Y in this case because Y is the longest side to the bounding box.


Leave the other parameters as default at this stage. I find this the most efficient way to work, since judging the slice spacing is easier if you get values back from the plugin.

Click OK and you are asked if you want to number the slices.


Say yes and you will get some details of measurements

The torus is quite large. I prefer to work with large objects and scale back at the end because it gives smoother edges to the slices.

The number of slices is far too much. In this case I want 11 slices. Odd numbers produce a slice in the centre of the Sliceforms. So 1585 divided by 11 gives a slice spacing of 144. Clicking OK here will give you a prompt to ask if you want to continue. Say No and the plugin exits.

Start the plugin again and enter 144 as the spacing. Repeat as before until you get to the measure dialog again. Unfortunately, this shows it will make 10 slices:


The plugin thinks this is reasonable, so it does not give you the option to cancel. Say know to the next prompts and let it create the slices and it will then come back to prompt to slice in the X direction with the same spacing of 144.


Cancel at this stage and the plugin will terminate with the Y slices cut.

Sketchup Sliceforms – Step 4 – Restart with a new spacing

Since these are wrong, undo the action (CTRL-Z) and start again, remembering to select the object. This time, if we divide 1585 by 12 we will get 11 slices, using a value of 132. The process will go to completion now, so there are a few more options to include. This time, change the layer option to create a new one:


I am leaving the slice thickness at the default, since I am only cutting the slot with scissors. If you are using a laser cutter or a CraftRobo, you would want to calculate the slot thickness and adjust appropriately.

When you click OK, give the layer a name:

And when you click OK here, the measure dialog shows we now have 11 slices:


Click OK and the base of the screen shows the calculation progressing. When it is finished you are asked if you want the Original Selection to stay hidden. Say Yes and the parameters for the next set of slices (X) comes up with the same spacing:

Again, make a new layer, and continue and name the layer and get the measure dialog box for the X slices.

Now you can continue to make the flattened slices and set the gap between them.


I found the value of 200 cm worked well.

Sketchup Sliceforms – Step 5 – Viewing the result

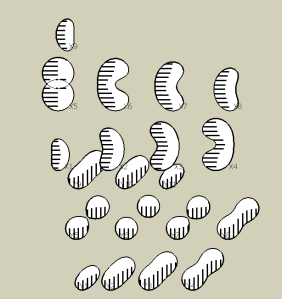
When the calculation is complete, the sliced torus is shown with copies of the flattened slices below:


Open Layers on the Window menu and make the various aspects of the model visible.

With the Flat-X slices layer invisible you can see just the Sliceform.

You can also make one of the slice layers invisible, so that you can see the Y slices for example.

Now make just the Flat-X layer visible and go to the Camera menu, choose Standard Views and then Top. Note how some of the slices overlap.


This is easily fixed, the two sets of slices are grouped so just move them so that they are independent.


Sketchup Sliceforms Step 6 – Outputting the result

This is the final step.
The output method you want to use will depend on how you want to produce the physical Sliceform. The following method is the one I use to cut out the slices with scissors.

I used the SVG export plugin from the Ruby Library Depot. There is another one here to give vectors drawings of the slices.

I then loaded the SVG into  the vector graphics program Inkscape.

The only problem I found was that the SVG file gives large slices which you have to scale.  The SVG has very small font sizes which I increased by edited the SVG file ina  text editor. I can add more detail if anyone wants it.

Having scaled the slices, you need to arrange them on the paper in order to cut them out. The slices for each direction need to be on different sheets. You must ensure that both sets are scaled at the same time in order that they fit.